Snowboard Width - Huh?
- Jul 30, 2011
![]()
How wide of a snowboard do I need? Where is the width of a snowboard measured? What does width mean in terms of my boot size?
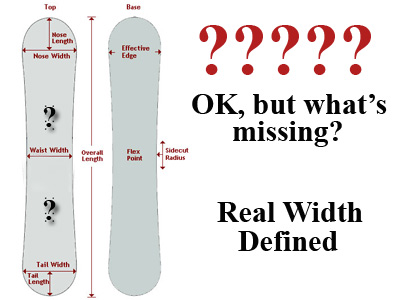
Let’s start by talking about measurements, because this is where a lot of the confusion arises. The most common width measurement that is provided by manufacturers is "waist". The waist is measured at the narrowest point near the middle of the board (usually). But like with all things in snowboarding, different brands measure different things. Some measure the midpoint between the tip and tail and call that "waist". Others simply provide a measurement they call, "width", but do not really specify what width they are referring to.
If that has you a bit confused, don't worry, because regardless of where these "waist" measurements are taken, they are not very useful for what they are typically used for. Most people think that this measurement is a good indicator of what foot size a board will handle. It is not, and for a simple reason: you do not stand at the waist, you stand at the inserts. A board's waist measurement is always less than the measurement at the inserts and often the difference is significant. Additionally, two boards with the same waist dimension, may have very different measurements at the inserts, depending on each board's sidecut. Measurement at the center insert is a much better way to compare boards for shoe size compatibility, but for some odd reason, manufacturers do not publish this info.
OK, so now we have told you why we think the commonly provided measurements are pretty silly, but what good does that do you? You still need to know how to figure out the correct width for your new board. Well, here comes. There are two easy steps to getting it right every time.
First, measure your bare foot. It is important that you do not try to use a boot size. It is also important that you measure in centimeters, because the board measurements that you will be comparing to will be in cm. Here is the method that we suggest:
Kick your heel (barefoot please, no socks) back against a wall. Mark the floor exactly at the tip of your toe (the one that sticks out furthest - which toe this is will vary by rider). Measure from the mark on the floor to the wall. That is your foot length and is the only measurement that you will want to use. Measure in centimeters if possible, but if not, take inches and multiply by 2.54 (example: an 11.25 inch foot x 2.54 = 28.57 centimeters).
Second, measure the board you are considering. This measurement is easy. It should be taken at the inserts. Try to measure at the inserts that you will be using to achieve your stance position. If you are unsure about this, simply measure at the center of the insert cluster (that will still be very close). Be sure to measure using the base of the board, not the deck. This is important because the sidewalls on many boards are angled in, and will therefore give you a smaller measurement on the deck than on the base. For our example's sake, let's say the measurement is 27.54 at the center insert.
Still with us? You are almost done. You now have a way to compare foot size to board width where it matters, but how do you interpret this info to get the correct width? Well that depends a little on stance angle. If you ride a 0 degree stance, you will want your foot size to be the same as the width of the board at the inserts or up to 1 cm greater. If you ride at an angled stance, you will want to measure the board across at the angles that you will be riding. Again, you will want your foot to at least match this measurement or exceed it by up to 1 cm. So using our example above, this guy has a foot 28.57 cm that exceeds the board with at the inserts 27.54 cm by 1.03 cm at a zero degree angle. But, when he angles his feet to the 15 degree angles that he rides, voila, he has .10 cm of overhang for a perfect fit.
But wait a second. Are we saying that you should have overhang, even with bare feet? Yes. You will need overhang to be able to apply leverage to your edges and to get the most out of your board. 1/2 inch to 3/4 inch of boot overhang for both toe and heel is ideal, and will not create problematic toe or heel drag. Remember that boots typically add 1/2 at both the toe and heel to your foot measurement from above, due to padding, insulation and the outer boot materials. We do not suggest using the boot length to size boards though, as the extra padding etc, cannot be used well to create leverage, that has to come from your foot itself. We highly recommend that riders do not choose boards where their feet do not come to or exceed the real board width.
OK, that's all well and good, but where can you get the information on board width at the inserts if the manufacturers don't provide it? That's easy. Email the store that carries the board(s) that you are considering. Give them your foot length in cm (and your stance width and angles if you know them). They will be able to provide you with the width at the inserts that you will be using and can factor in your stance angle as well to get you the exact overhang that you will have with bare feet.
PS:
Once mounted, the best way to test is to put your (tightly laced) boots into your bindings and strap them in tightly. It is important that you have the heel pulled all the way back into the bindings heel cup or the test won’t help. On a carpeted floor place your board flat on its base. Kneel behind the heelside edge and lift that edge so that it rests on your knees and so that the toeside edge is angled down into the carpet. Now press down with both hands using firm pressure, one hand on each of the boots. This will compress the board's sidecut and simulate a turn on hard snow. You can change the angle of the board on your knees to become progressively steeper and you will be able to see at what angle you will start getting toe drag. You will want to repeat the test for your heelside as well. If you are not getting drag at normal turn and landing angles, then you are good to go.
PPS:
Also a note about boots: Boot design plays a big role in toe drag as does binding ramping and binding base height. Boots that have a solid bevel at the toe/heel drag less. Many freestyle boots push for more surface contact and reduce bevel. This helps with contact, but if you have a lot of overhang with those boots it hurts in terms of toe drag.
Now go ride!